Friday, December 28, 2012

MAMEcade Rev 1.2

Lightguns and Stickers
  I know I have not updated the blog in awhile, but I have recently updated my arcade with light guns and also a few stickers to make it go faster.

Stickers
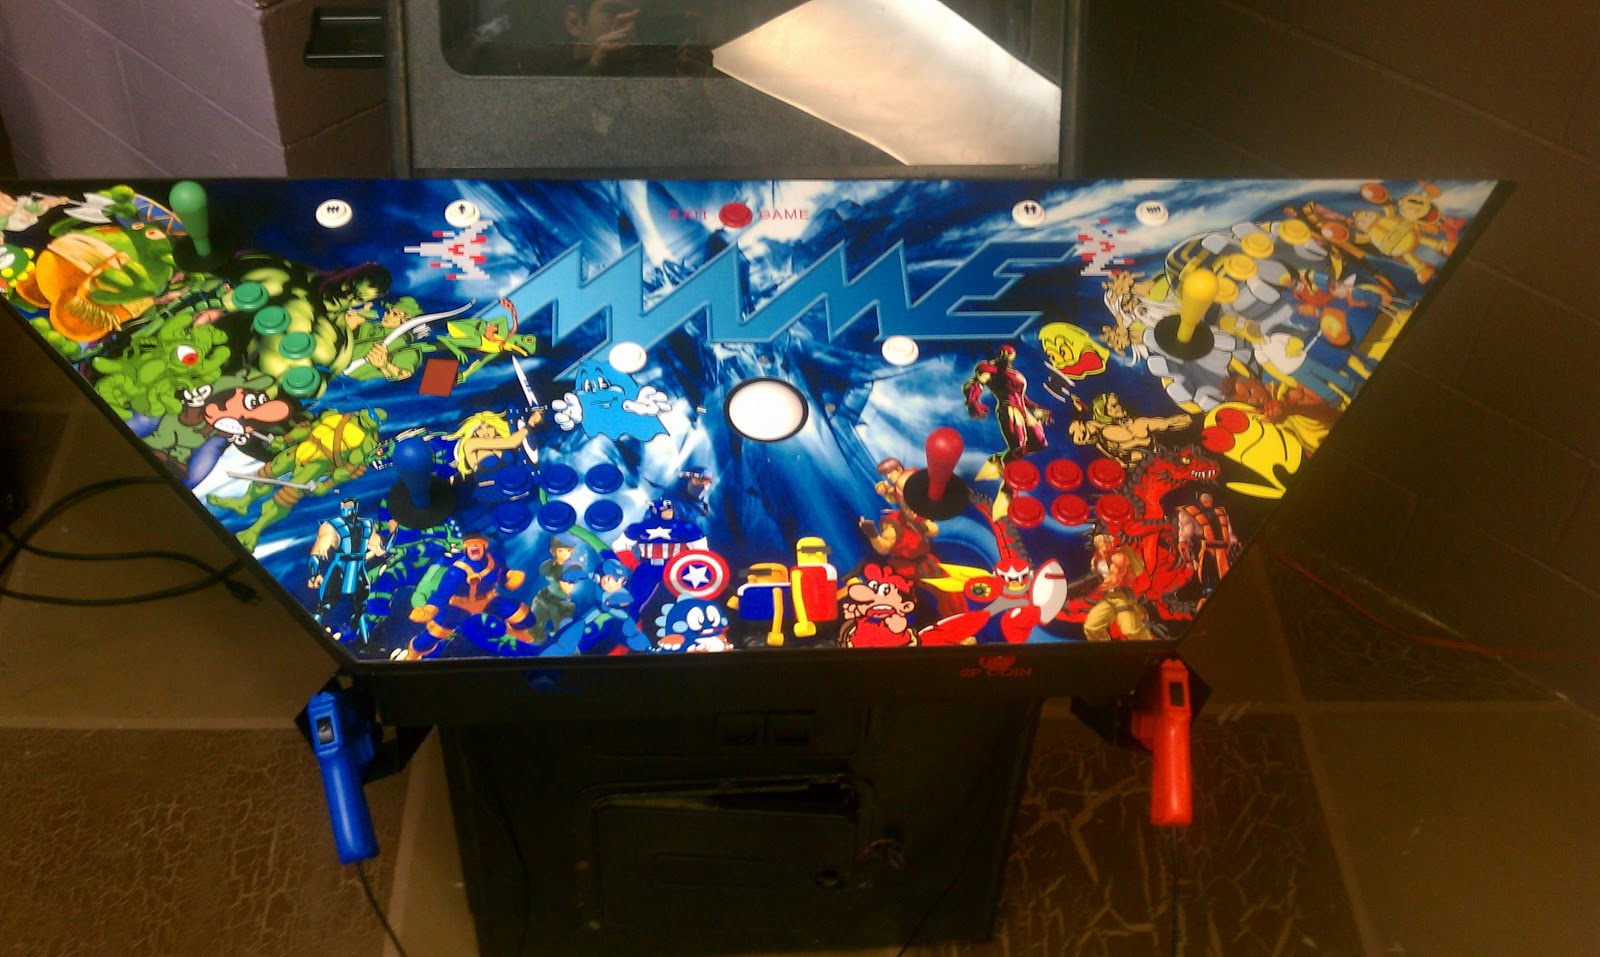
  I hopped by my local Hobby Lobby and grabbed a pack of alphabet and number stickers in Red, Green Yellow, and Blue.  I wanted to indicate the coin up buttons with 1P Coin, 2P Coin etc.  I also wanted to indicate the exit game button in the center of the CP.  I tried to line up with lettering as best I could, but I feel I fell short on this.  The letters tend to go either down or are not all in a straight line.  Still, I am happy with the way it turned out.


After I had the stickers in place, I went back over the areas with mod podge to give it all a consistent look. I think it turned out pretty well.


Light Guns
  Now onto the really fun stuff.  I ordered a pair of light guns from http://www.arcadeguns.com/, they have a pair of guns plus a sensor bar for $168, which is not too shabby.  I got the sensor bar uncased since I will be mounting it to my bezel.  When the package came it contained the two guns with 10 ft usb cables, and the sensor bar with around a 5 ft. cable.  The cables for the guns were plenty long, but I wish the sensor bar cable had been longer, as I had to move my computer around in the cabinet, but it was not a huge deal.  The package also came with some manuals.  I picked these guns specifically since they used the Ultrimarc Aim Trac components which I read were the best.  I was not disappointed.


My first tasks (after moving the computer), was to mount the sensor bar behind the bezel.  I drilled holes for all the IR sensors (5 on left and 1 on the right) to poke through.  I was able to get a snug fit, and the sensor bar did not need anymore mounting as the led's held it in place.


  Here are the leds in the bezel (They do not light up where the human eye can see them, so they are pretty incognito when you have it all rigged up.)

Calibration
  One of the hardest (if not the hardest) parts of the light gun MAME setup is the calibration.  I spent a few hours tweaking the calibration by re calibrating the guns and judging were the best place to stand was.  I finally figured out that the best place it a few feet away and in the center, this was hard for me to figure out as I was calibrating the 1 player gun to be standing just to the left, and 2 player gun standing just to the right. After I found this out, I calibrated the guns in the center, and I haven't felt it to be really off, although I still need to play test it with friends more.  If anyone knows any good calibrating tips, please let me know by posting in the comments, I would be very appreciative!

Holsters
  The final part to have the guns added to the mamecade was having holsters for them.  I searched around online, and saw a few ideas of using towel holders, bike mounts, etc, but what I was looking for was more of the big metal pentagon holster that I remember from the arcades.  I found that HAPP sells something like this, but it would have to be modified, and I did not want to pay $30 for them, so I headed over to Home Depot, and I found what I was looking for.  In total it cost me around $5 and a lot of sweat equity.
  First I found some sheet metal that were  bent at a 70 or so degree angle, and they were longer on one side then the other.  I bought 4 each for each gun, and a mounting hurricane bracket for each gun.


  Next I started to solder the "plates" together to start to form my pentagon.

Yes, Yes I am awesome at soldering...


After I got to the last two plates I had to duct tape them together as they didn't quite reach, I then solder the tops together and voila!


I have my holster.


I then drilled two holes to mount the hurricane bracket at an angle, and then spray painted it black.


After that I took off my control panel and screwed the holster to the back of the front end of the CP.


Rinse and repeat for gun #2 and I have my holsters.

They look pretty snazzy!


Thanks for tuning in!

Monday, October 22, 2012

MAME Reviews: Dark Seal

MAME Review
  Since it is October I thought I would review a "scary" game that I found on my mamecade.  Although, once I got into the game it wasn't that scary, but I already played it so I'll go ahead and review it!


Dark Seal
  Dark Seal also known in the US as Gate of Doom, is an action hack n' slash arcade game released by AV Japan in Japan and Data East in the US.  The game has a 2D isometric view and consists of 1 or 2 players hacking and slashing their way through a series of dungeons and other terrain until they reach that level's boss.  Sadly the game tends to drag after the the first few levels and never really picks up steam due to repetition and bland enemies.


Initial Start
  When the game boots up you are greeted with an introduction to the plot, which to sum up is, "when the people of the world become evil, then demons take over, and then four heroes of light will appear to right the world again."  Which to me is just the usual song and dance for an old school fantasy game, since this was released in 1990 I don't fault any plot like this.  Once you throw in your coin you are greeted with more plot dialogue on something of a dark knight stealing a princess, so I am not sure if we are killing two birds with one stone or some type of sub plot is going on, but after this you are then taken to the character select screen


Characters
  You have your selection of the four heroes of light, the Knight, the Wizard, The Bard, and...the Ninja, which seems really out of place to me in a medieval European fantasy setting, but whatever, lets go with it.  Each character has a different weapon, and special skill, the Knight has a better weapon that does more damage, the Wizard has powerful magic, the Bard is immune to poison, and the Ninja is...fast, like a ninja.  You can see most of these advantages play out as you play through the game, and it does add a small strategic element to the game, but not much.


Controls
  The controls consist of an 8-way directional joystick and two action buttons.  One button is for attack and the other is for magic.  Your attacks vary from character to character, with the Ninja and Wizard having projectile weapons (that do not go the length of the screen) and the Knight and Bard having melee weapons that reach just about as far as the projectiles, so there really isn't much difference in attack.  Since all the enemies come out of the wood work to run into you, you are usually frantically trying to fend them off
  The magic works with filling up the magic bar, by attacking enemies, after this you have a book displayed on the upper right or left of the screen switching through icons, once you press the magic button you will use whatever magic the icon on the book is currently showing.  I find this to be a lackluster way of using spells  as when you are in a pinch you do not have proper choice of spells, you either have to hope it is a good spell, or wait for that one to come on the screen.


Level Design
  The level design for the dungeons and other terrain start out well, with varying enemies and traps, but after a few levels it just becomes very repetitious and dull.  I got extremely tired with having the same types of enemies barraging me from every direction that after awhile I just picked the Ninja and ran through every stage.  That is the main problem, there is nothing you have to do to advance to the next area except get to the end and none of the enemies really stop you from doing this.  I realize this is the case in most beat em ups and hack n slash games, but at least most of those A) have a mechanic that stops your progression until all enemies are defeated on the current screen, and B) it is actually entertaining to beat up enemies!


Graphics
  The game in the graphics department is not too bad.  Nothing mind blowing but it isn't bad to look at it either.  Death animations for normal enemies is nothing more than a pretty explosion, but the bosses and mid bosses do have a neat death animation for each, so that is something...I guess.

Conclusion
  Dark Seal or Gate of Doom, is not an awful game, but it does become awful after a few levels.  All in all it is your standard arcade beat 'em up with a medieval European theme to it...and a Ninja.  If you happen to chance upon it, in whatever fashion you are playing games, give it a go, but don't feel like you are missing out on anything if you haven't tried it.  Until next time, thanks for reading!

Sunday, October 7, 2012

Media Closet Install

Basic Idea
  So I have my man cave looking pretty good, what with the arcade and all, and I knew that I wanted to have a flat screen mounted on one of the walls downstairs.  There was one wall that I had in mind as it was adjacent to a small closet.  My end goal for the whole project was to have a clean looking flat screen mounted, with all my current consoles hooked up, as well as my media server.  I like the idea of having a TV mounted to the wall with nothing showing around it, but all this great entertainment coming from it.
Initial Setup
  So here is the initial setup of the TV.  As you can see I have a drop ceiling in the basement, and also the power and coaxial cable are on the bottom of the wall.  I also have my PS3 HDMI and USB cables, Wii Component cables, and audio cables all coming down from the ceiling.  It looks pretty bad.  The game console cables run up to the ceiling and then over (to the left) into the closet, or what I am now calling the media closet.

Moving Cables
  First, I need to move all my media cables behind the wall.  Now this is more difficult than normal since this is an outside wall, and it has insulation within it.  I had to buy a fish tape to get this completed.  I used some wire coat hangers that I unbent, and then duct taped together. This works pretty good if you just need to guide the cable and you have nothing in your way; but if you have a wall with insulation then you are gonna need something like a fish tape to get the job done.
  Here I have all the cables behind the wall except my PS3 camera.  I use USB extension cables to deal with the length of cable I need.  I also extended the Wii component cables with AV connectors and more AV cables.  All the AV cables are the same thing, so I used the Red, White, Yellow cables of a composite set connected to the Blue, Red, Green cables of the component...this just got really confusing didn't it? 
Now all the cables are behind the wall.  You can see at the top I cut a hole above the drop down ceiling to start running the cables behind the wall.
  After I moved the ceiling tile back in place I then needed to move the power plug behind the TV.  First, I shut off the breaker to the plug and then went about daisy chaining the electrical cables and sending them 5 feet up the wall.  I cut a hole at the TV mount and re installed the power outlet.  It really didn't take too much time, all I needed was about 5 feet of electrical cable, and an electric box.  I also bought a face plate to cover the bottom hole that was left where the electrical outlet used to be.

  Here is a final shot of the setup without the TV mounted...it looks like my wall is throwing up cables...kinda badass actually.

TV mounted

Motion Controls
  Now I have the TV mounted but my motion controlled games are not able to be played in the current setup.  The issue is two fold.  First, the Wii needs a light source for the motion controller to work.  Since the length I needed to go was too long for the standard Wii sensor bar that comes with the console, I had to buy a wireless one.  I found one on eBay for pretty cheap, around $5.
 Second, the PS3 camera has a big issue with staying still.  I can currently set it on top of the TV, but I cannot get it to stay in the position I want since the cable coming out the back end really dictates which was it will face.  Whether Sony did this on purpose to sell more clips, I have no idea, but as you know I am very cheap frugal.  So I looked around online for a cheap Sony PS3 clip, and found one for $1 on amazon with FREE SHIPPING.  I kid you not, I quickly ordered without looking at the length of time it would take to get here.  Afterwards, I found out it was going to take around 5 weeks because it came from China.
Yeah...The P-S3 camera clip.  Now this is a problem because I do not own a P-S3, but I thought I would give it a try anyway...and it worked!
Now, with the camera clip I am done with the TV setup.  Here is the finished product looking nice and slick on my purple wall...I am looking into painting that sometime in the future.


On the left you can see the media closet door.  This is where I have the PS3 and Wii stored, and I am planning on moving the Media Server down there and streaming all my media through out the house via the home network.


Here is a shot of the inside of the media closet.  I have the Wii up top, and the PS3 with some blu rays and loose games on the mid shelf, my move equipment is on the bottom.  I really like having all this in a easy to access area, but also having the overall game area being clean.  It helps too for motion controlled games to have a lot of space to work with so you don't accidentally smack something with your arm...Having said that I am signing off to go play some Kung-Fu Live!  Until next time.

Tuesday, September 25, 2012

MAME Review SegaSonic The Hedgehog

MAME Review
  Now that the cabinet is complete, I finally get to actually use it and play some games.  I thought I might review some games on there, and possibly for other games I have on other game systems.  For my first review I picked a game that caught my eye while I was wading through my list of arcade games.  Part of the fun of finishing an arcade is getting to go through and test to make sure all the games work. This would only be hard work for someone who doesn't like games. Luckily for me, I love playing old arcade games. Luckily for you (or maybe unfortunately for you?), I'm also nerdy enough to love reviewing them.
SegaSonic The Hedgehog
   Pretty much everyone has heard of Sonic the Hedgehog. It was a staple of any kids video game collection in the 90's. But, not everyone has heard of SegaSonic the Hedgehog. It was released in Japan in 1993 and had a limited release in the UK, and some other English speaking countries.  Released in between Sonic 2 and Sonic 3, the game stars Sonic the Hedgehog along with Mighty the Armadillo, and Ray the Squirrel.  You may never have heard of the other two characters, and you are not alone.  Ray would only return to the Sonic world in Knuckles Chaotix, and Ray has not returned to any Sonic game as of 2012.

Controls
The game is different than the typical Sonic games most of us know, in that the player(s) control Sonic, Ray, or Mighty with a trackball and one button.  This type of interface for the Sonic games is unique, and I find that it fits the Sonic brand perfectly.  Why wouldn't you want to control Sonic (who spends half his blazing fast runs in ball form) with a ball, unless you just hate the trackball interface for games, then I could see this not making sense to you.  The game is displayed in a top down isometric format where you can move sonic and his cohorts in a pseudo 3D plain in all directions with the trackball.  This view format would not be revisited until Sonic 3D blast, which came out on the Sega Genesis 3 years later, and the trackball interface has not been revisited since.  The trackball is used to guide sonic and his friends throughout the levels, and the one button will allow your character to jump; precise timing is needed to pull of some of the quick gaps that come up in your way.
  Moving the trackball left will move your character left, and moving the trackball right will move your character to the right, and the rest is true for all the other directions.  Most of the levels are laid out so that a diagonal motion with the trackball is needed to allow your character to go in the correct direction of the track.  I do not know why the designers chose this, as I felt it was more difficult to keep rolling the trackball at an angle rather than vertically or horizontally.

Level Design
  The basic premise of the game is that Doctor Robotnik has captured your character.  After breaking out of your cell, you are then rocketed out of Robotnik's lair by him.  Why he captures you just to shoot you around the island, I still don't know.  Of course all the dialog is in Kanji (Japanese lettering) so I am just going off of the animation, and the few words that are in English. 
  All the levels start with Dr. Robotnik initializing some type of hazard that slowly creeps up on you as you run to the end of the level.  This is incentive for you to move fast, or as I like to call it, the "motivational" hazard.  However, this does help to keep the pace of the game moving along quickly.  You then need to guide Sonic along the level, which can change direction from time to time, but there is no time limit, except for the "motivational" hazard that will kill your character should you move too slow.  I found these hazard to increase and decrease in speed when I would run faster or slower, but they would eventually catch up to me if I was too slow, or would stop completely.  There are additional hazard that will come from below, above, and from the sides of the course. 
  Within each level are rings that you can get, although I found this hard as they pop up quickly, and if you do not already know the level layout you will have to hit the brakes and turn around to grab them.  Once you reach the end of the level you will be given a percentage total of how many rings you have collected. If you collect enough, over the 50% level, you will be given a ring bonus, which entails more points, yay!  These points, of course, increase your score, which is something all arcade players are a slave to. 
  All in all I like the level design. Each level features different obstacles and hazards to avoid, and the course changes up enough on its direction that they do not feel stale after a few levels.  It keeps you on your toes, and has you smacking the trackball as quickly as possible to beat your "motivational" hazard from behind you, as well as keeping your finger on the jump button in case anything should pop up, or fall beneath you.

Graphics
  The graphics for this game are great, especially considering the game was released in 1993.  Sonic and his pals look very good, maybe the best I have seen in this perspective.  As stated earlier the only other Sonic game I can think of where we have this view field for him is Sonic 3D blast, and this topples those graphics in comparison.  Although to be fair, Sonic 3D blast was running on Sega Genesis/Mega Drive hardware, and this arcade was running on the Sega System 32 hardware, which is a much more powerful system than the home console.  There was a release of Sonic 3D Blast on the Sega Saturn with improved graphics, and I still think that these arcade graphics top the Saturn version on 3D blast.
  All the animations when the characters are jumping look very fluid as well as when they pick up speed and start to run very fast.  All the levels are varied with great depth perspective. Whether you have Sonic running along the high walls of a volcano or swimming beneath the river from a mountain, the perspectives are all great.

Difficulty 
  The difficulty of this game is pretty high, as should be expected with most arcade games.  If you are unfamiliar with the level design be prepared to fall and die a lot.  Having said that, it is still a fun game, and even better the second and third time around.  The fast paced game play will keep you moving and trying to hit all the lines of rings that you can.
  The developers at least gave some slack and decided to give a warning when your character is getting too close to the edge. If you run up to an edge Sonic will start to wobble and then fall after a few seconds.  If you are quick enough you can spin the trackball in the opposite direction and Sonic will run away from the cliff...of course, this doesn't help with the "motivational" hazard coming from behind. It can make for some intense moments when you're trying to race Sonic through the course. 
Final Thoughts
  SegaSonic the Hedgehog is a unique game in the Sonic the Hedgehog series.  It has a fun control mechanic that works well with the franchise, and also keeps the fast pace arcade fun that it is going for.  The graphics still hold up after all the years and the pick up and play availability of the game compliments it's aggressive difficulty level.
  If you have a chance to play this game do not miss out.  It is tons of fun, sadly the only way you may get to play it would be in a MAME cabinet.  Not many arcades of this are around, and most of re-purposed.  The MAME experience is still great though, so if you have a chance go for it!  What's your favorite Sonic the Hedgehog game? Thanks for tuning in!